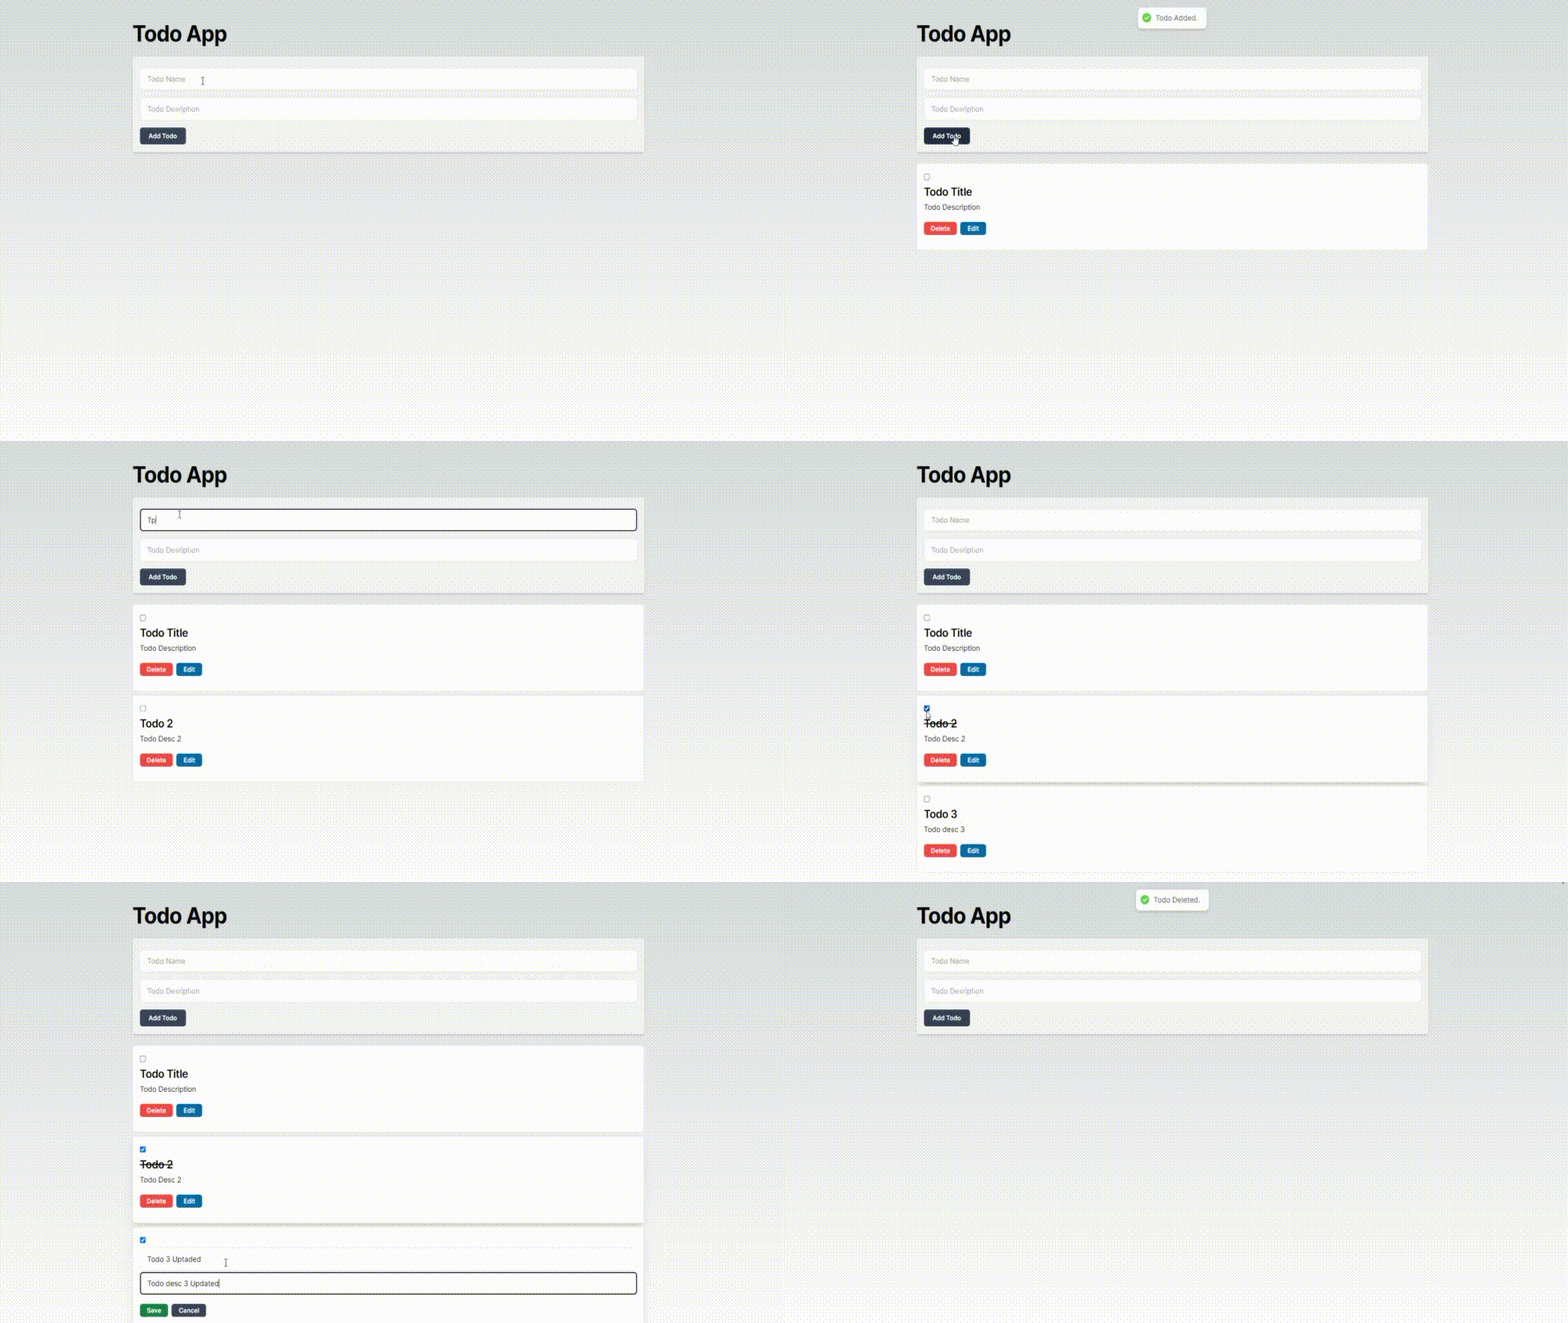
Our Todo App Project Here

First of all to start the project create a folder and open in your code editor.
Run this command
npx create-next-app@latestWhat is your project named? my-app
Would you like to use TypeScript? No / Yes
Would you like to use ESLint? No / Yes
Would you like to use Tailwind CSS? No / Yes
Would you like to use `src/` directory? No / Yes
Would you like to use App Router? (recommended) No / Yes
Would you like to customize the default import alias (@/*)? No / Yes
What import alias would you like configured? @/*TypeScript: Yes
ESLint: Yes
Tailwind: CSS: Yes
Src directory: No
App Router: Yes
import alias: No
The libraries we will use in this project
We will use clsx and react-hot-toast in this project.
To install clsx runthis code in your terminal
npm install clsxTo install react-hot toast runthis code in your terminal
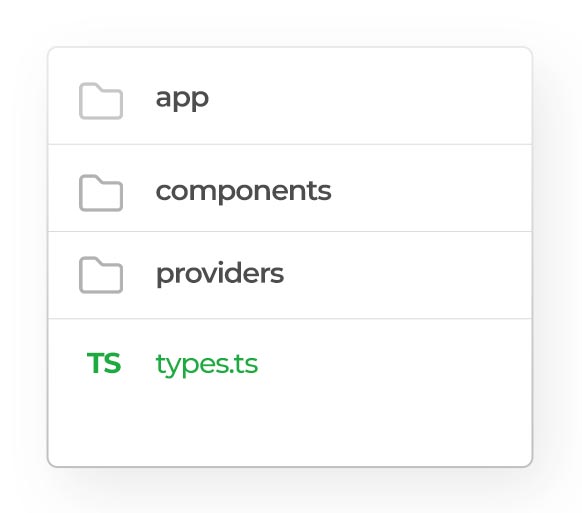
npm install react-hot-toastYour Project Structure will look like this
Create a Container Component
Now Create a container component inside of our components folder. Create a container.tsx file inside your components folder. And copy and paste that code into container.tsx file.
components/container.tsx
// container.tsx
import clsx from "clsx"
interface ContainerProps {
  children: React.ReactNode
  className?: string
}
export const Container: React.FC<ContainerProps> = ({
  className,
  children,
}) => {
  const classes = clsx(
    {
      "max-w-[1170px] mx-auto py-6 my-6 space-y-6": true,
    },
    className
  )
  return <div className={classes}>{children}</div>
}
Create a Heading Component
Now Create a heading component inside of our components folder. Create a container.tsx file inside your components folder. and copy and paste that code into container.tsx file.
components/heading.tsx
//heading.tsx
import clsx from "clsx"
interface HeadingProps {
  title: string
  description?: string
  className?: string
}
export const Heading: React.FC<HeadingProps> = ({
  title,
  description,
  className,
}) => {
  const classes = clsx(
    {
      "space-y-2": true,
    },
    className
  )
  return (
    <div className={className}>
      <h1 className=" text-3xl md:text-5xl font-bold tracking-tight">
        {title}
      </h1>
      <p>{description}</p>
    </div>
  )
}
Now create types.ts file in root directory. We will add our Todo types and use it whenever we need it.
types.tsx
export interface Todo {
  id: number
  title: string
  description: string
  done: boolean
}
Create ToastProvider component
Now we will create a provider folder inside root directory and create a toast-provider.tsx in this folder. We will use this component in our layout.tsx.
providers/toast-provider.tsx
"use client"
import { Toaster } from "react-hot-toast"
export const ToastProvider = () => {
  return <Toaster />
}
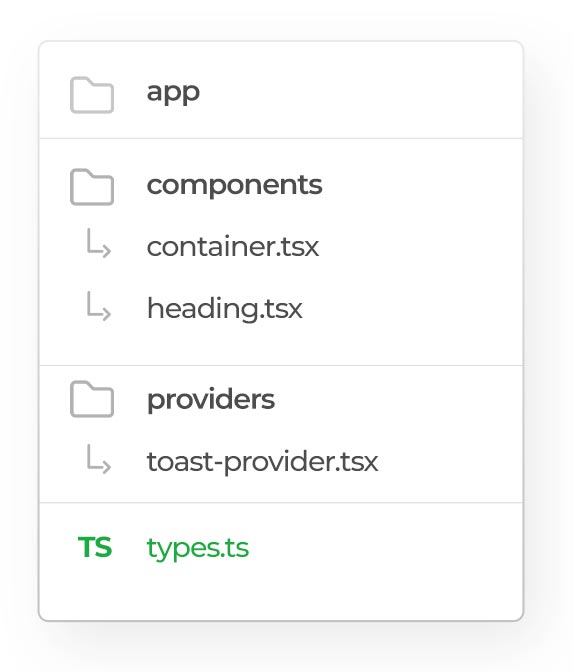
Your Project Structure will look like this

Now add your ToastProvider component inside your layout.tsx
app/layout.tsx
const inter = Inter({ subsets: ["latin"] })
export const metadata: Metadata = {
  title: "Create Next App",
  description: "Generated by create next app",
}
export default function RootLayout({
  children,
}: Readonly<{
  children: React.ReactNode
}>) {
  return (
    <html lang="en">
      <body className={inter.className}>
        <ToastProvider />
        {children}
      </body>
    </html>
  )
}
Create a TodoApp Component
Create a TodoApp Component with name todo-app.tsx inside of your component folder
component/ todo-app.tsx
"use client"
import { useState } from "react"
import { AddTodoForm } from "./add-todo-form"
import { TodoList } from "./todo-list"
import { Todo } from "@/types"
import toast from "react-hot-toast"
export const TodoApp = () => {
  const [todos, setTodos] = useState<Todo[]>([])
  function onAddTodo(title: string, description: string) {
    setTodos([
      ...todos,
      {
        id: nextId++,
        title: title,
        description,
        done: false,
      },
    ])
    toast.success("Todo Added.")
  }
  function onDeleteTodo(todoId: number) {
    setTodos(todos.filter((todo) => todo.id !== todoId))
    toast.success("Todo Deleted.")
  }
  function onChangeTodo(newTodo: Todo) {
    setTodos((prevTodos) =>
      prevTodos.map((todo) => (todo.id === newTodo.id ? newTodo : todo))
    )
  }
  return (
    <div>
      <AddTodoForm onAddTodo={onAddTodo} />
      <div>
        <TodoList
          onChange={onChangeTodo}
          onDelete={onDeleteTodo}
          todos={todos}
        />
      </div>
    </div>
  )
}
let nextId = 0
Create a AddTodoForm Component
Create a AddTodoForm Component with name add-todo-form.tsx inside of your component folder
component/ add-todo-form.tsx
"use client"
import { FormEvent, useState } from "react"
interface AddTodoFormProps {
  onAddTodo: (title: string, description: string) => void
}
const AddTodoForm: React.FC<AddTodoFormProps> = ({ onAddTodo }) => {
  const [title, setTitle] = useState("")
  const [description, setDescription] = useState("")
  const [validate, setValidate] = useState("")
  function handleSubmit(e: FormEvent<HTMLFormElement>) {
    e.preventDefault()
    if (!title) {
      setValidate("Title is required")
      return
    }
    if (!description) {
      setValidate("Description is required")
      return
    }
    onAddTodo(title, description)
    setTitle("")
    setDescription("")
    setValidate("")
  }
  return (
    <form
      onSubmit={handleSubmit}
      className="space-y-4 bg-white/60 p-4 border  shadow-md rounded-md mb-6"
    >
      <div className="my-2">
        <input
          className="w-full h-12 p-4 rounded-md border"
          placeholder="Todo Name"
          value={title}
          onChange={(e) => setTitle(e.target.value)}
        />
      </div>
      <div className="my-4">
        <input
          className="w-full h-12 p-4 rounded-md border"
          placeholder="Todo Desription"
          value={description}
          onChange={(e) => setDescription(e.target.value)}
        />
      </div>
      {validate && (
        <span className="text-sm inline-flex bg-red-50 px-3 rounded-md font-semibold text-red-400">
          {validate}
        </span>
      )}
      <div>
        <button
          className="p-2 bg-slate-700 hover:bg-slate-800 transition-all text-white text-sm font-semibold px-5 rounded-md"
          type="submit"
        >
          Add Todo
        </button>
      </div>
    </form>
  )
}
export { AddTodoForm }
Create a TodoList Component
Create a TodoList Component with name todo-list.tsx inside of your component folder
component/ todo-list.tsx
import { Todo } from "@/types"
import { TodoItem } from "./todo-item"
interface TodoListProps {
  todos: Todo[]
  onDelete: (id: number) => void
  onChange: (todo: Todo) => void
}
export const TodoList: React.FC<TodoListProps> = ({
  todos,
  onDelete,
  onChange,
}) => {
  return (
    <div className="flex flex-col gap-2">
      {todos.map((todo) => (
        <TodoItem
          onChange={onChange}
          onDelete={onDelete}
          key={todo.id}
          todo={todo}
        />
      ))}
    </div>
  )
}
Create a TodoItem Component
Create a TodoItem Component with name todo-item.tsx inside of your component folder
component/ todo-item.tsx
"use client"
import { Todo } from "@/types"
import { useState } from "react"
import toast from "react-hot-toast"
interface TodoItemProps {
  todo: Todo
  onDelete: (id: number) => void
  onChange: (todo: Todo) => void
}
const TodoItem: React.FC<TodoItemProps> = ({ todo, onDelete, onChange }) => {
  const [isEditing, setIsEditing] = useState(false)
  const [editedTodo, setEditedTodo] = useState(todo)
  const [validate, setValidate] = useState("")
  const handleSaveClick = () => {
    if (editedTodo.title.trim() === "") {
      setValidate("Title is required")
      return
    }
    if (editedTodo.description.trim() === "") {
      setValidate("Description is required")
      return
    }
    setIsEditing(false)
    onChange(editedTodo)
    toast.success("Todo Edited")
  }
  const handleInputChange = (field: keyof Todo, value: string) => {
    setEditedTodo({
      ...editedTodo,
      [field]: value,
    })
  }
  const handleCancelClick = () => {
    setIsEditing(false)
    setEditedTodo(todo) // Revert changes
  }
  let todoContent
  if (isEditing) {
    todoContent = (
      <>
        <div className="my-2">
          <input
            className="w-full h-12 p-4 rounded-md border"
            placeholder="Todo Name"
            value={editedTodo.title}
            onChange={(e) => handleInputChange("title", e.target.value)}
          />
        </div>
        <div className="my-2">
          <input
            className="w-full h-12 p-4 rounded-md border"
            placeholder="Todo Description"
            value={editedTodo.description}
            onChange={(e) => handleInputChange("description", e.target.value)}
          />
        </div>
        {validate && (
          <span className="text-sm inline-flex bg-red-50 px-3 rounded-md font-semibold text-red-400">
            {validate}
          </span>
        )}
        <div className="actions text-sm flex gap-x-2 py-4">
          <button
            onClick={handleSaveClick}
            className="px-4 rounded-md py-1 text-white bg-green-700 font-semibold"
          >
            Save
          </button>
          <button
            onClick={handleCancelClick}
            className="px-4 rounded-md py-1 text-white bg-gray-700 font-semibold"
          >
            Cancel
          </button>
        </div>
      </>
    )
  } else {
    todoContent = (
      <>
        <h4
          className={`text-2xl font-semibold tracking-tight ${
            todo.done && "line-through"
          }`}
        >
          {todo.title}
        </h4>
        <p>{todo.description}</p>
        <div className="actions text-sm flex gap-x-2 py-4">
          <button
            onClick={() => onDelete(todo.id)}
            className="px-4 rounded-md py-1 text-white bg-red-500 font-semibold"
          >
            Delete
          </button>
          <button
            onClick={() => setIsEditing(true)}
            className="px-4 rounded-md py-1 text-white bg-sky-700 font-semibold"
          >
            Edit
          </button>
        </div>
      </>
    )
  }
  return (
    <div
      className={`bg-white border space-y-1 rounded-md p-4 ${
        todo.done ? "bg-green-50 shadow-xl" : ""
      }`}
    >
      <input
        type="checkbox"
        checked={todo.done}
        onChange={(e) => {
          onChange({
            ...todo,
            done: e.target.checked,
          })
        }}
      />
      {todoContent}
    </div>
  )
}
export { TodoItem }
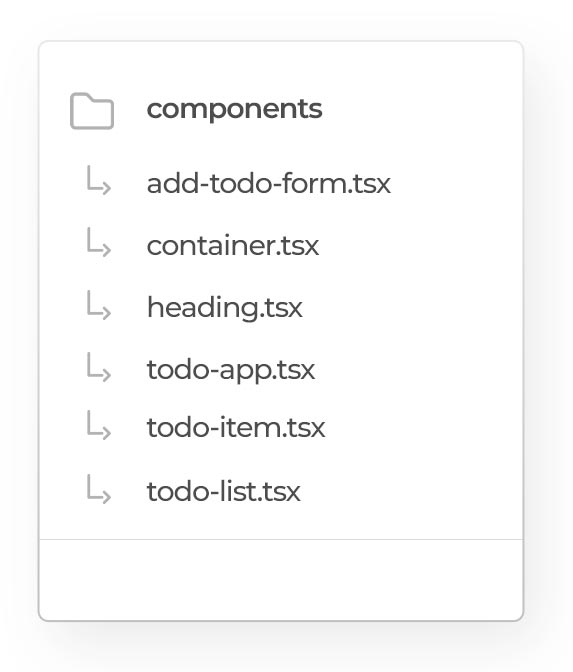
Now your components folder will look like that

run this command in your terminal to start your next.js projext
npm run devConclusion
In this project, we implemented a simple todoApp application using useState. We learned how to add, delete and edit Todo. This project is for educational purposes in a static structure.
However, if you are asked to create a todo app during next.js and react job interviews, you can easily handle it. See you again in our next training with a todo app that offers a better user experience using shadcn-ui, zod and react-hook-form.


